The Half Dome hike is the single most epic hike in California’s Yosemite National Park, with a thrilling and scary cables section at the end of the trail that leads you to panoramic views of the entire Yosemite valley!
Half Dome is normally accessed by the popular Mist Trail, where you’ll get to see two big waterfalls, giant sequoia trees, and other scenery along the Merced River. This is a very hard and strenuous day hike, so it’s not for everyone, but standing on top of Half Dome is such a great achievement if you can do it.
The Half Dome cables section at the end of the hike is especially challenging, and could be dangerous if you’re not careful. Permits are required for the cable section since 2010 to keep the route safer and less crowded, and these are handed out by lottery.
This travel guide for the Half Dome hike will explain how to climb it safely, where to find the trailhead in Yosemite, how to get Half Dome permits, and everything else you need to know before you go!
Quick Facts
- Distance: 16.5 miles (26.5 km) round trip
- Elevation Gain: 5,300 feet (1,615 m)
- Top Elevation: 8,844 feet (2,695 m)
- Duration: 9 – 12 hours round trip
- Difficulty: Hard

The cables section is one of the top highlights of the Half Dome hike
What And Where Is Half Dome?
Half Dome is a granite peak at Yosemite National Park, in the Sierra Nevada mountains of California.
Yosemite is located near the center of California state, so it’s within driving distance of Fresno, Sacramento, San Francisco, and other big cities in the United States, including Las Vegas, Nevada.
The park is about 2.5 hours of driving from Fresno, 4 hours from San Francisco, or 7 hours from Las Vegas.
Half Dome Hike: What To Expect
A typical Half Dome hike starts with a very early wakeup and then a long uphill hike via the Mist Trail, which is another of Yosemite’s most popular hiking trails.
At the end, you’ll reach the Half Dome cables section, where you have to climb up a steep mountainside aided by a series of metal cables. This thrilling climb is what puts Half Dome on many peoples’ bucket lists.
The Half Dome cable section is not to be underestimated. It is seriously scary, and people have fallen and died on the cables. It’s a safe enough climb if you’re careful, but I wouldn’t recommend it for everyone.
The details below will explain each part of the Half Dome trail and what to expect. The entire hike is amazing, from start to finish!

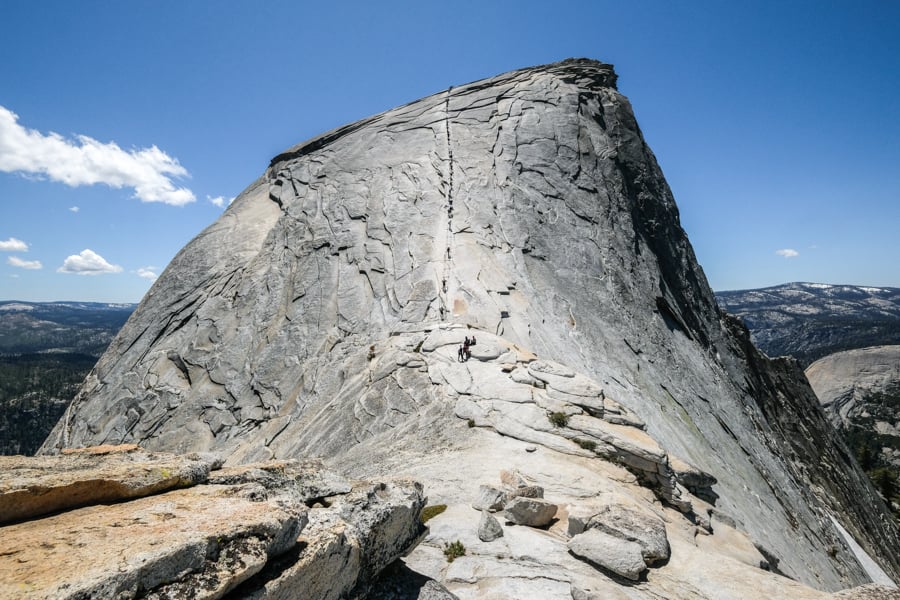
Summit view on the Half Dome hike

See the tiny hikers climbing the Half Dome cables?
• Mist Trail vs John Muir Trail (JMT)
The first decision you’ll have to make is whether you want to hike Half Dome from the Mist Trail, or the John Muir Trail (JMT).
Both use the same trailhead at Yosemite, and they’re practically identical in terms of difficulty, although the scenery is a bit different. The Mist Trail is slightly shorter than the John Muir Trail, but slightly more steep. Both trails merge at the top of Nevada Falls, and then there’s only one trail to go to Half Dome.
Both routes are nice. The main considerations are crowds, safety, and scenery. I think it’s best to do the Mist Trail first on the way up (when it’s not crowded yet), and then go down the less busy and less slippery John Muir Trail on the way back.
That’s safer and more efficient, and it’ll also give you a good mix of views and photo ops.

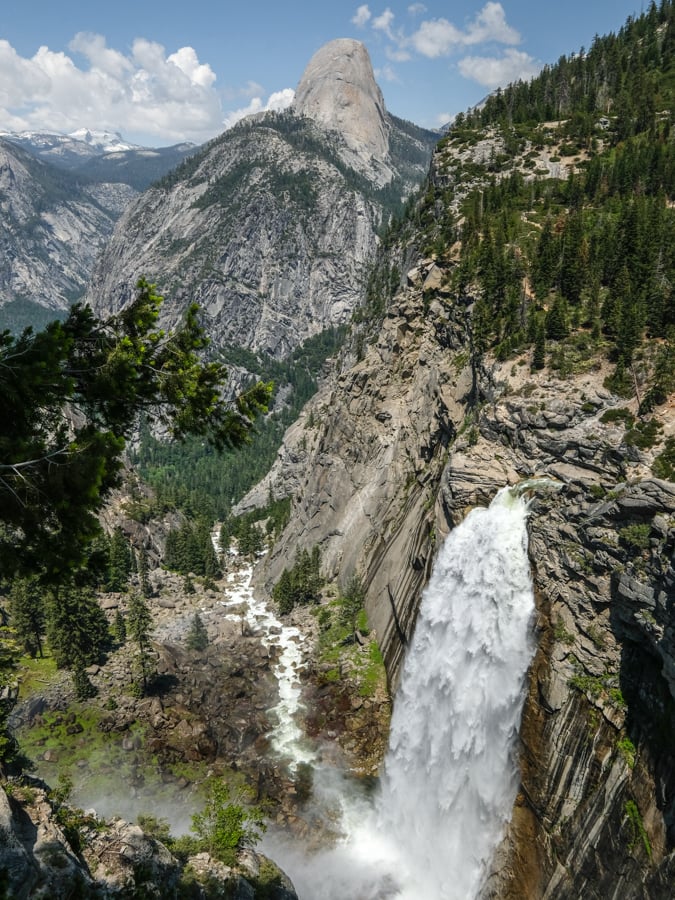
Along the way to Half Dome, you’ll pass Nevada Falls and the Liberty Cap.
Of course, you can also hike Half Dome via the Mist Trail in both directions, or the JMT in both directions. In total, that means there are 4 possible combinations to use for this leg of the hike, and any of them work just fine.
The pictures in this guide were taken in the daytime, but keep in mind things will look a bit different when you first start the hike in the early morning.
If you have time on a separate day, I would recommend doing a practice run of the trail up to Nevada Falls to familiarize yourself with the route and terrain before you do it for the Half Dome hike.
That’s not a must, but I think you’ll find it helpful. Besides, the waterfalls are amazing and worth seeing twice!
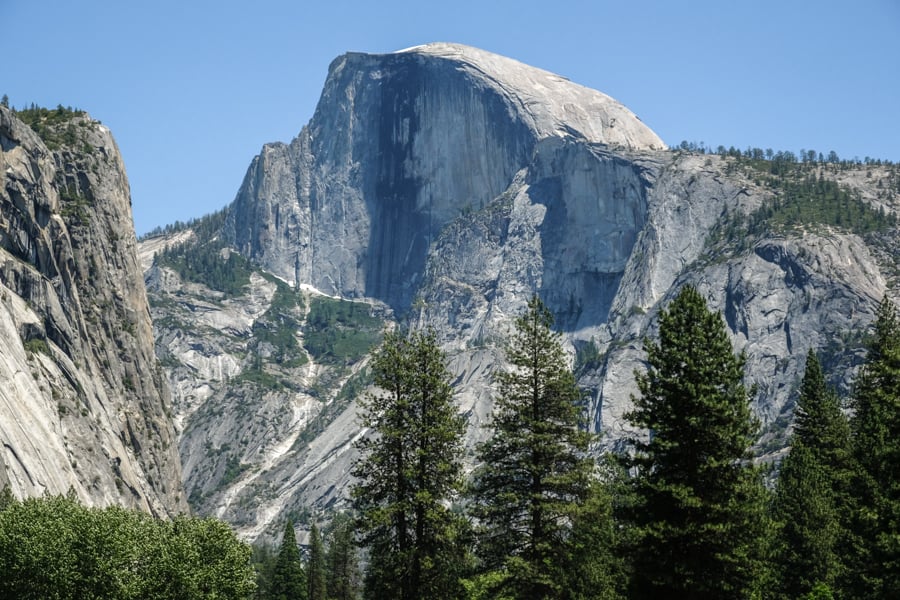
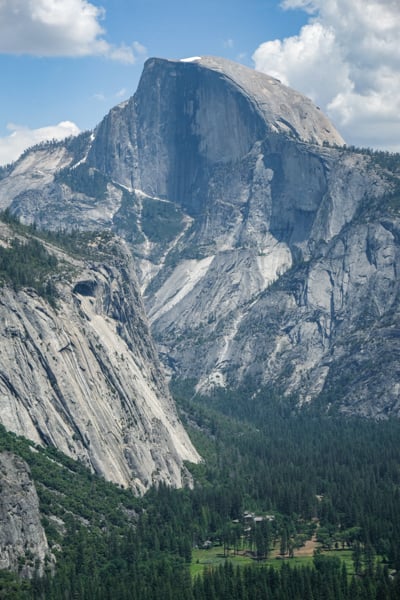
Half Dome as seen from Yosemite valley. The cables are on the opposite side.
• Half Dome Trail Map
Here’s an interactive Half Dome map showing the trail sections and possible routes:
- Orange. The Mist Trail. This is the main route used for the first part of the Half Dome hike.
- Blue. This is the main trail to Half Dome after the Mist Trail and JMT converge above Nevada Falls.
- Yellow. The Half Dome cables section. This is the last and best part of the hike!
- Red. The John Muir Trail (JMT). This route is often used on the way back down instead of the Mist Trail.
- Purple. The Panorama Trail. This is an uncommon alternate route to Half Dome.
This map also shows the parking and trailhead locations for starting the hike in Yosemite National Park.
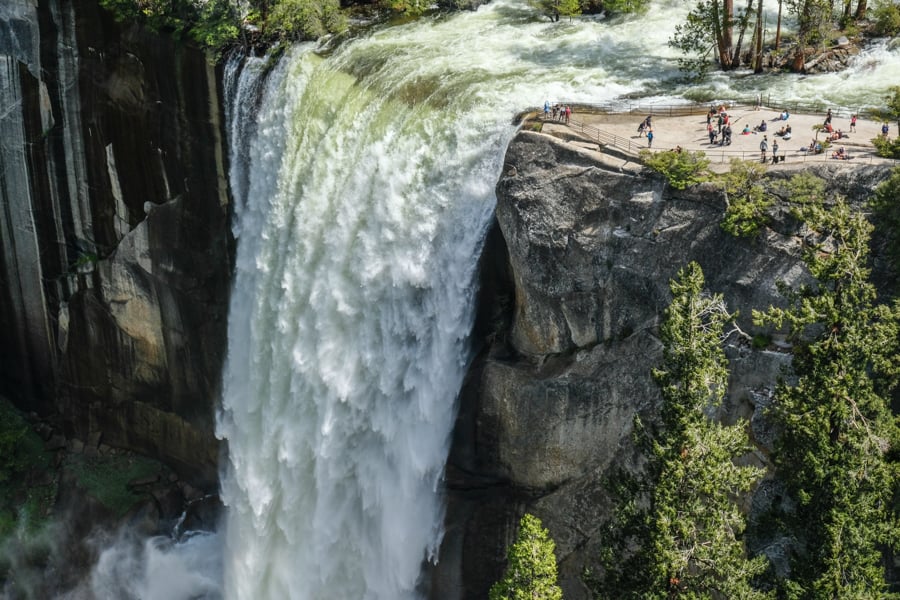
• Part 1 / 7: The Mist Trail To Vernal Falls
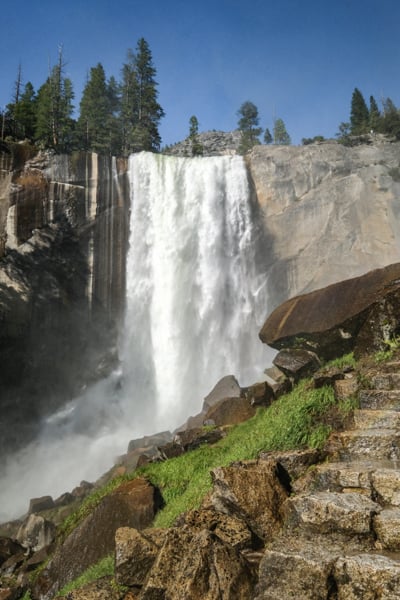
The Mist Trail to Half Dome starts out on a steep, paved path that climbs up to the top of Vernal Falls, a beautiful 317-foot waterfall on the Merced River. This trail doesn’t start out easy. You’re gaining elevation right away.
After about 1 mile of hiking, you’ll cross the Vernal Fall foot bridge and get your first views of the waterfall. There’s a bathroom with flush toilets here, and a nice water fountain with safe, potable drinking water, but the usefulness is pretty limited for Half Dome since it’s so early in the hike.
Next, you’ll hike along near the Vernal Falls on a rocky granite stairway that eventually leads to the top of the waterfall. This is one of my favorite falls in Yosemite, and rainbow sightings are practically guaranteed during the daytime.
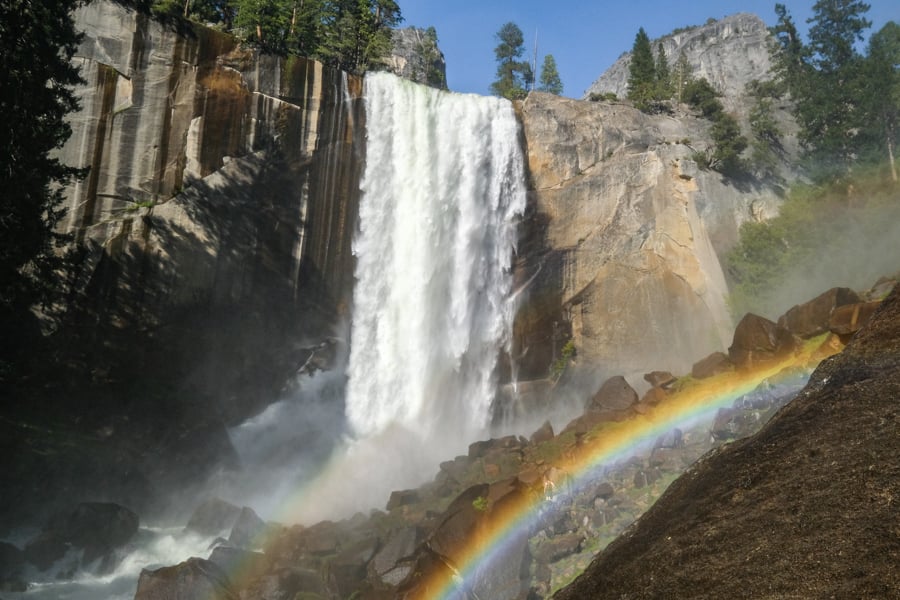
Vernal Falls rainbow
Watch your step at Vernal Falls because there’s a lot of spray and mist, and the steps may be slippery.
This is how the Mist Trail got its name, after all. In the spring months, it can be especially crazy and you might even need a rain poncho like I did!
When you reach the top of Vernal Falls, there’s a big flat area where you can stretch and rest for a minute while peeking over the railing at the edge of the waterfall. It’s an amazing view.
You can also find more bathrooms just a little ways past this area.
Above Vernal Falls
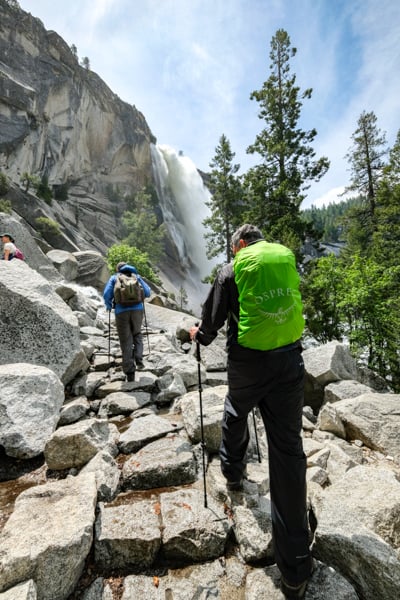
• Part 2 / 7: Vernal Falls To Nevada Falls
Now it’s time for the 1.5 mile climb up to the top of Nevada Falls! This path is even steeper and more rocky than the path you just climbed to Vernal Falls, although it starts out gentle.
There’s a short bridge crossing and some great views of the Liberty Cap mountain and Nevada Falls from a distance, but for the most part, you’ll be walking through a shady forest with not much to see or photograph along the way. Maybe it’s good motivation to keep pushing even faster to the top!
Don’t get me wrong, Nevada Falls is a very impressive 594-foot waterfall that sounds like thunder in the springtime, but the best views of this one are not seen from the trail below, but actually from the platforms above.
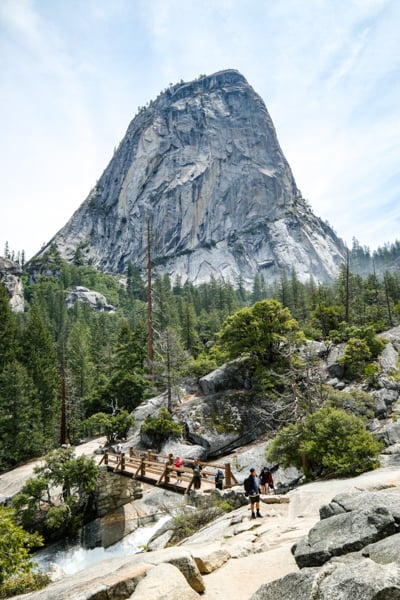
Bridge
Trail
When you reach the top of Nevada Falls, there’s another outhouse and also a fork in the path: you can take a short detour to see the waterfall from above, or you can continue on the main path to ‘Little Yosemite Valley’ and eventually Half Dome.
If you need extra drinking water, you can filter it from the river above Nevada Falls, but remember to be very careful here because the rocks are slippery and the river can be dangerous.
You may not have much time to enjoy Nevada Falls during the Half Dome hike since you’ll have other priorities, but I’d highly recommend spending some more time here later on the way back down from Half Dome.
There are several viewpoints above the waterfall that are stunning, but it takes a bit of time to do them justice!
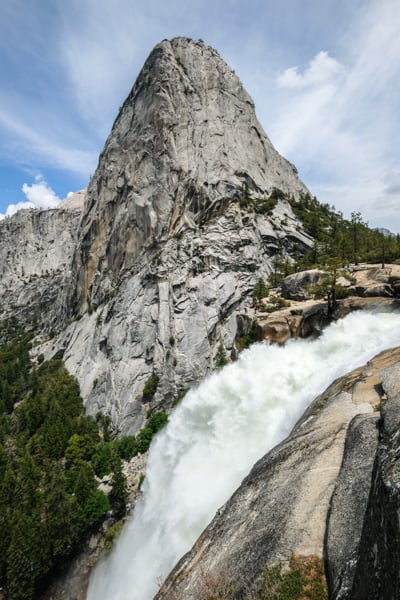
Nevada Falls
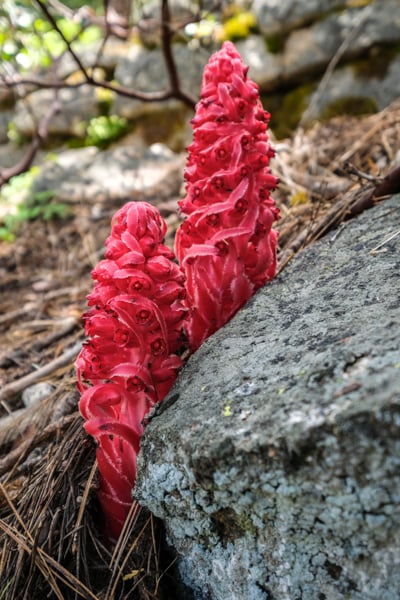
Snow flowers
• Part 3 / 7: Little Yosemite Valley To Sub Dome
After you pass Nevada Falls, it’s time for what is (in my opinion) the longest and slowest part of the Half Dome hike, although the scenery never stops being worthwhile. You can even see some sequoia trees (giant redwoods)!
First, you’ll hike about 1.5 miles through the ‘Little Yosemite Valley.’ Thankfully, this is one of the flattest parts of the whole trail, so it’s a good opportunity to catch your breath before things get challenging again, which they soon will.
The next section is a relentless uphill trudge that lasts 2.3 miles. This is where things get tedious, and there’s not a whole lot to see except forest.
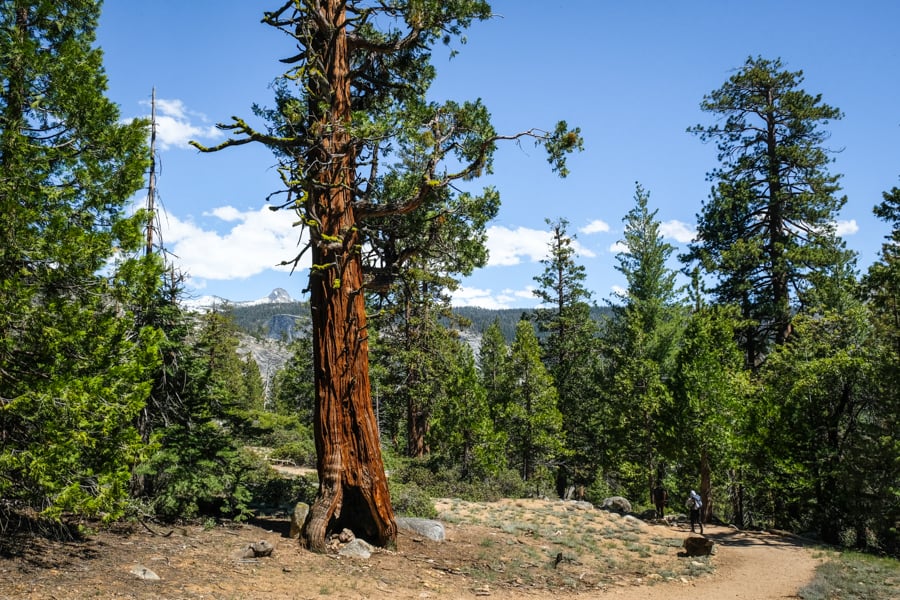
Giant redwood tree near Little Yosemite Valley
When you finally reach a clearing at the top of the trail, things really open up!
At this point, you can see expansive views of Yosemite National Park, with Mount Watkins and other peaks staring at you from across the valley. In the springtime, I could see several big waterfalls in the distance.
The trail also flattens out for awhile, so you can enjoy the scenery again without huffing and puffing.
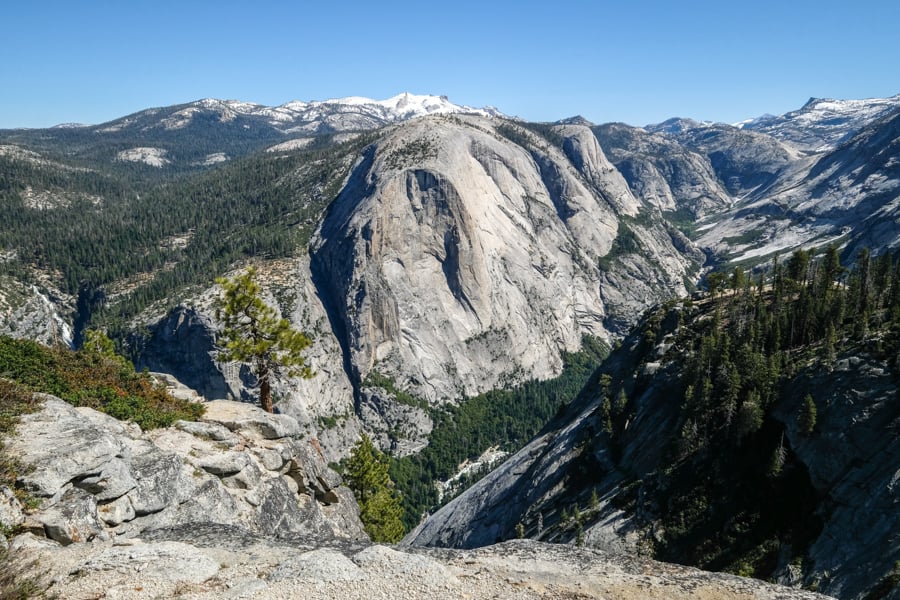
Valley views on the way to the Sub Dome
Here, you’ll even catch your first views of the Half Dome and its pointy summit, although it’s still mostly obscured by the Sub Dome.
If you look closely, you might even see some hikers climbing on the cables near the top of Half Dome, but they’ll look like tiny specks in the distance.
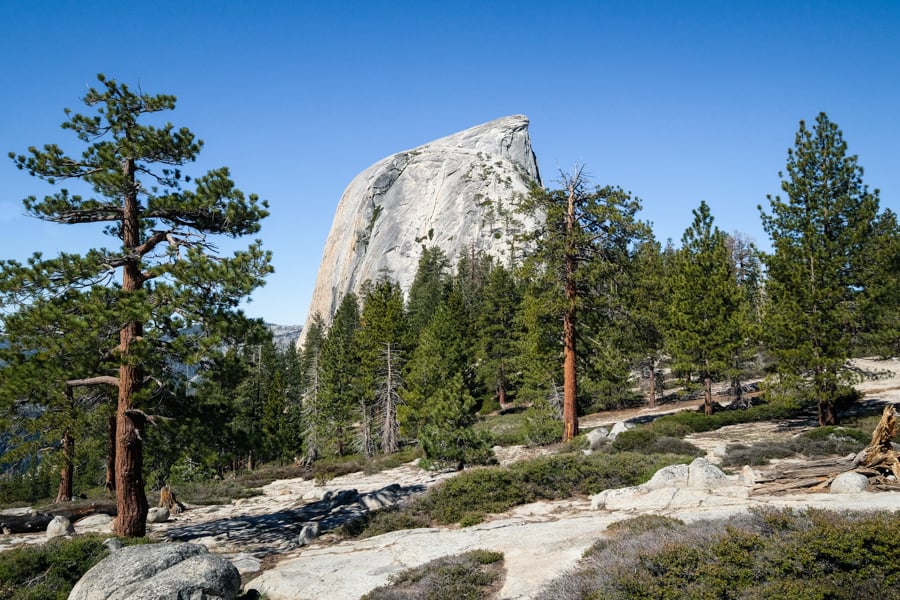
Half Dome’s pointy peak hiding behind Sub Dome
After a short walk, you’ll find a Yosemite National Park ranger (or volunteer) sitting at the base of the Sub Dome, checking everyone’s IDs and permits for the Half Dome cables section.
The park ranger will give you a brief safety talk and some basic tips for navigating the cables, and then you’re free to start hiking up the Sub Dome as soon as you feel ready.
If you don’t have a permit for Half Dome, this is where your hike ends, unless you can find another hiker with an unused permit who’s willing to give you theirs. I’ll discuss how to get a permit in more detail later in this guide.
• Part 4 / 7: Climbing The Sub Dome
The climb up Sub Dome is another tough workout, with steep switchbacks all the way to the top.
The terrain changes here and you’re walking on granite steps again, similar to the ones at Vernal Falls, except at this point you’re probably feeling very exhausted and wiped out after doing so much of this in one day.
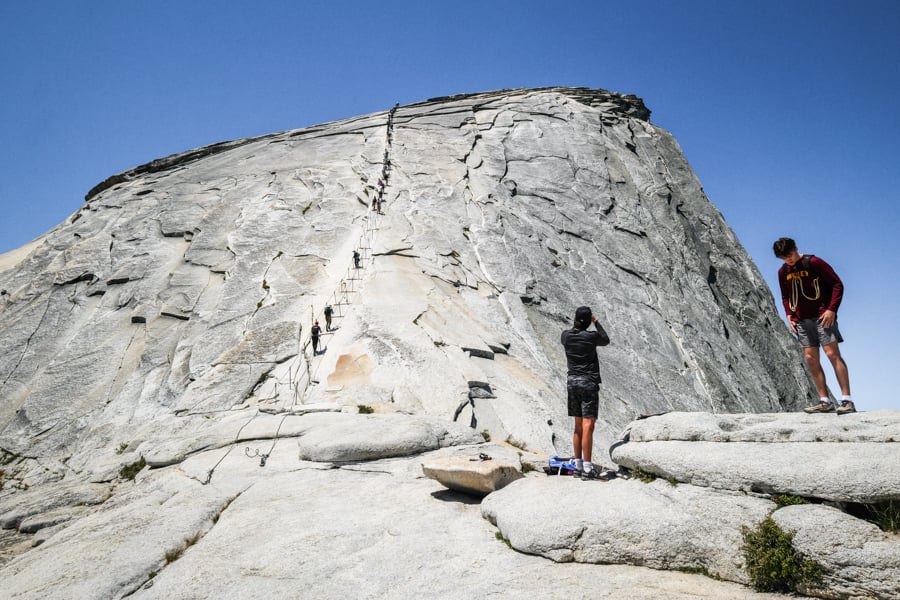
The end is almost in sight! When you reach the top of Sub Dome, you’ll get your first view of the Half Dome — a steep, angled rock face with tiny hikers climbing up the cables in a line. They look like ants climbing a ladder!
There’s plenty of flat space on the Sub Dome, so you can rest up, eat, drink, and prepare your gloves or other gear before tackling the cables. You don’t have to rush. Enjoy the scenery and catch your breath, because things are about to get crazy!
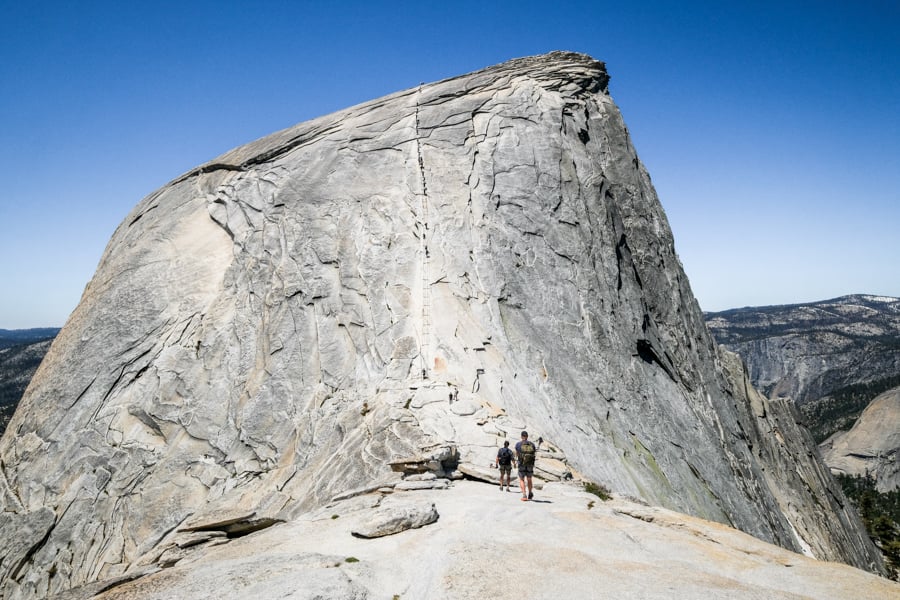
One of the best views on the Half Dome hike
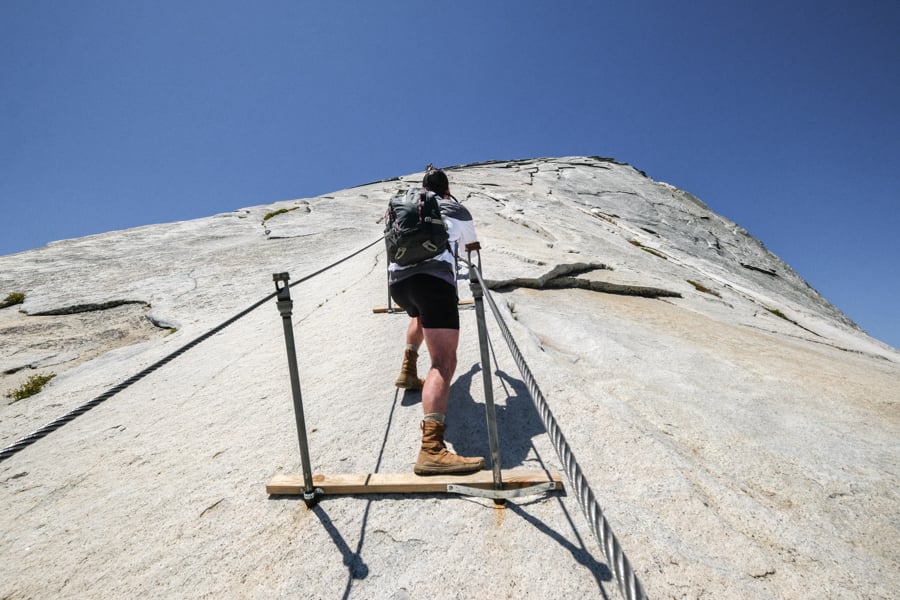
• Part 5 / 7: Half Dome Cables Section
Now it’s time for the grand finale: the Half Dome cables section!
This is the most thrilling and challenging part of the hike, and it’s what makes Half Dome such a unique and epic experience sought out by so many hikers visiting Yosemite National Park.
You’ll be climbing a slick granite slope with the aid of cables, poles, and wooden boards. One of the main challenges of climbing Half Dome is the slippery granite surface that makes it hard to get any traction with your feet.
The cables give you something to hold and pull yourself up with your hands, while the boards give you somewhere to place your feet without slipping. They may have a little bit of wobble, but they’re sturdy and safe, so you can trust them.
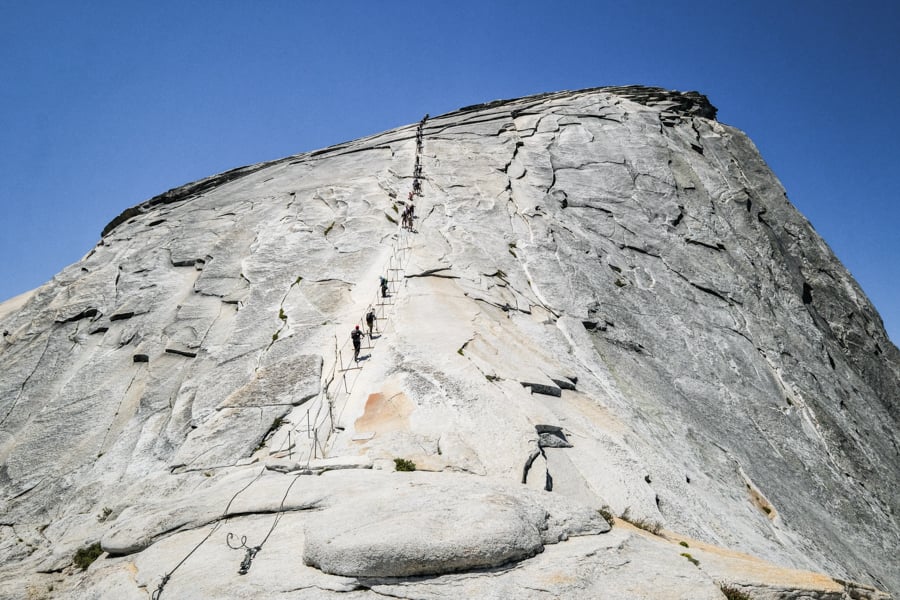
Half Dome cables section
Your upper body strength may be put to the test here, but if you need a break you can always stop on one of the wooden boards and wrap your arms around a cable. Take it one board at a time. The boards are the safest place to rest.
The climb may look almost vertical from below, but it’s actually closer to a 45 degree angle. Even so, it’s steep enough to be scary and potentially dangerous if you’re not careful. If you fall outside of the cables, there’s nothing to stop you from sliding hundreds of feet off the cliff.
The slope seems to get especially steep near the middle. Even though the Half Dome cables section is only 1/10th of a mile long, you’re gaining 400 feet of vertical elevation.
If the cables aren’t crowded, you can reach the top in 30 minutes or less, although it may feel longer in your mind because you can’t see the summit and you’re mainly focused on not falling.
Climbing the Half Dome cables

Steep and scary!
• Part 6 / 7: Top Of Half Dome Summit
Just when it seems like the cables couldn’t get any steeper, things suddenly flatten out and you’ve reached the top of Half Dome. Congratulations!
After you catch your breath, there’s lots of room on the peak of Half Dome to spread out and look around. The summit has 360 degree panoramic views of Yosemite National Park.
In front of you is Yosemite valley, with its green meadows and steep rock walls. Behind you are the precarious cables you just climbed, and the rest of the hikers on Sub Dome now look like tiny ants. What a view!
My favorite spot for pictures here is a little feature called the ‘visor’ or ‘diving board’ of Half Dome, where you can stand and get your picture taken with the steep cliff directly below you, and all of Yosemite valley in the background.
Remember to watch your step here because there are huge drop-offs, and you may be feeling a bit numb to danger at this point after climbing the cables!
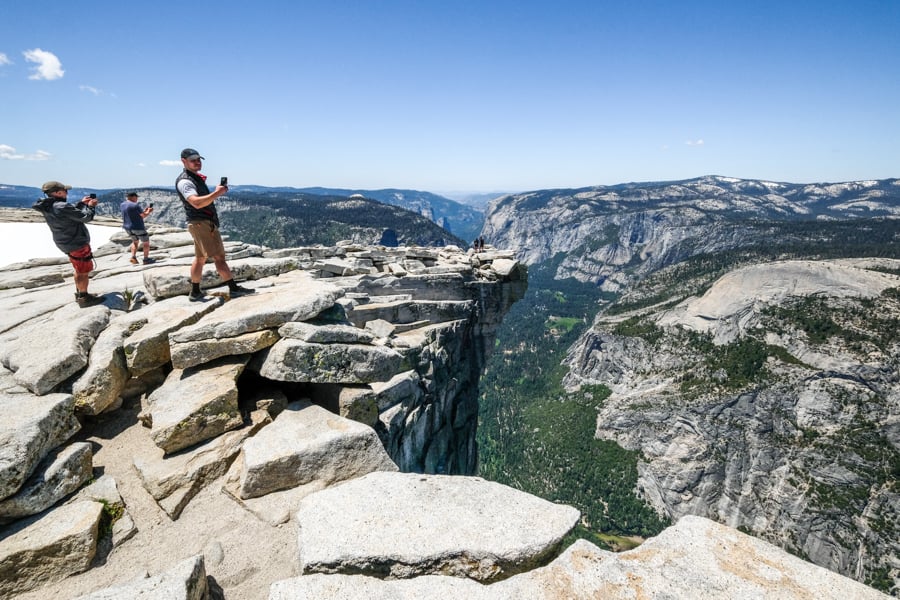
Half Dome summit views
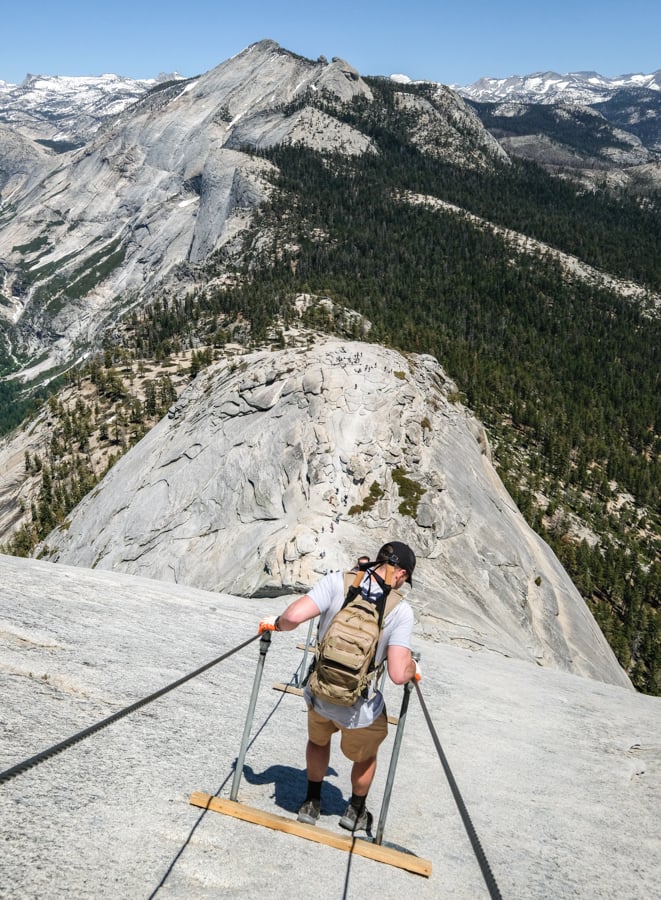
• Part 7 / 7: Going Back Down
Some people will say it’s easier going down the Half Dome cables than going up, but I think it’s almost as challenging. It is a lot less of a workout for your arms, so that’s a plus, but you’ll still have to grip the cables like crazy to keep from slipping.
I found it helpful to turn around and descend backwards, holding one cable with both hands, like you’re rappelling down the slope. That way you’re not staring at the scary view, and you also have better traction, whereas if you go down the other way your body balance is more awkward and you could fall face forward if your feet slip.
Going down the cables will almost certainly be slower than going up. For one thing, there will be more people on the cables by then, and you’ll have to stop and go past each other. Even so, it shouldn’t take more than 45 minutes to get back down.
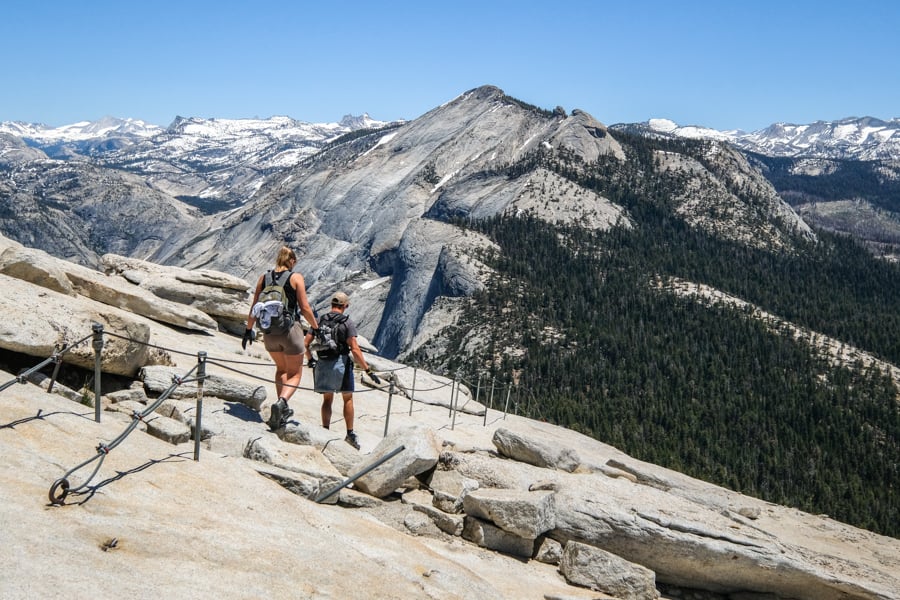
Time to go back down the Half Dome cables
Now it’s time to decide if you want to go back to Yosemite valley via the Mist Trail, or the John Muir Trail.
Again, I’d recommend going back down on the John Muir Trail since it’s less crowded and has better footing than the wet steps of the Mist Trail. Instead, you’ll be hiking down dry switchbacks with less people.
On the way back via John Muir, you’ll also pass directly over Nevada Falls, so you can look at the viewpoints above the waterfall as you go.
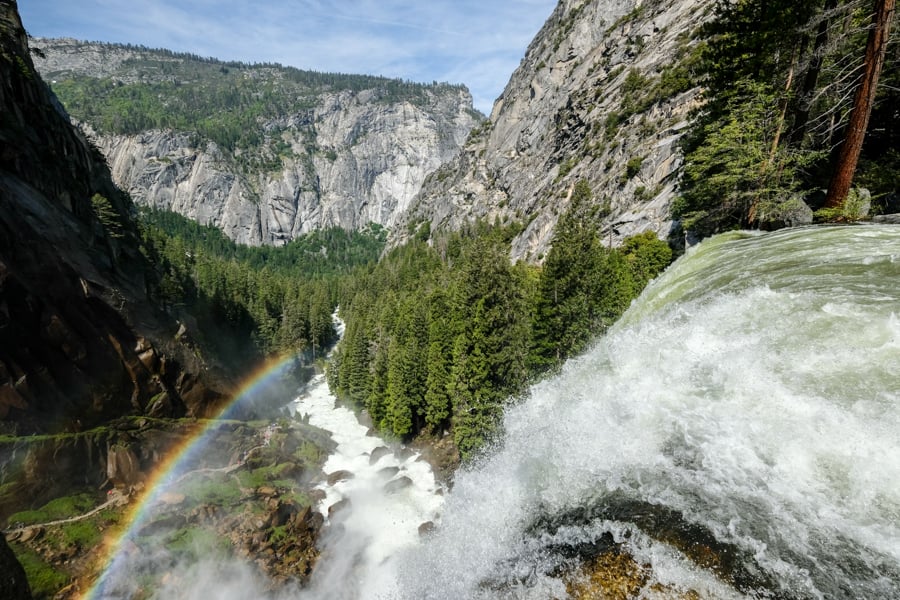
In fact, if you still have energy left when you reach the sign for Clark Point, you could even do a short detour to the viewpoint of Vernal Falls from above. This was one of my favorite views in Yosemite National Park!
Vernal Falls as seen from above near Clark Point. See the tiny people?
How Hard Is The Half Dome Hike?
Half Dome is a very hard hike. The cable section alone is plenty challenging both mentally and physically, but you also have the difficulty of getting there in the first place, which requires hiking uphill all day on steep and rocky trails.
According to the Yosemite National Park website, hundreds of people need ranger assistance on this hike every summer, and most of these emergencies could have been prevented. Even if you’re a regular hiker, it’s a very good idea to train for the Half Dome trail.
If you’re already in Yosemite National Park, there are plenty of good hikes to practice on. Any long hike with lots of elevation gain will do. I practiced by hiking to Yosemite Point and then walking around in the valley afterwards — all on 2 hours of sleep.
Yosemite Point is not as hard as Half Dome, but it’s good practice, and it’s worth doing anyway since it’s an amazing hike!
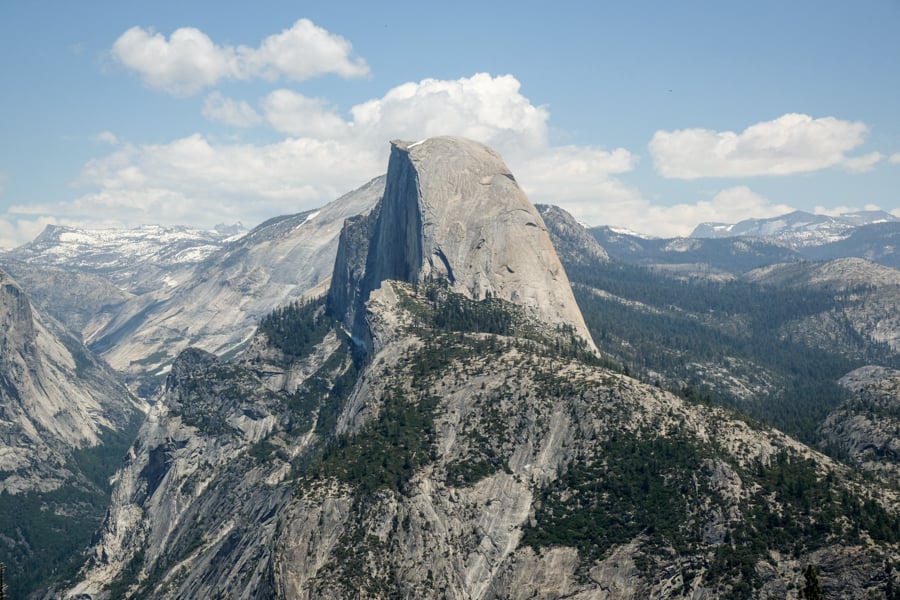
Half Dome as seen from Glacier Point in Yosemite National Park
How Long Is The Half Dome Hike?
Half Dome is a very long day hike. Plan to take anywhere from 9 to 12 hours, depending on your pace. I’d say 10+ hours is normal for fit hikers, and if you’re a slow hiker you might even need more than 12 hours. I’ve heard of slow groups taking 15 hours to complete the hike.
The amount of time you’ll need depends on your fitness level, how many people are in your group, how much exploring you do at the summit, how many pictures you take, and what time of day you start — later in the day is hotter and the trail is more crowded, so that can slow you down.
From the trailhead, the Half Dome hike has a distance of 16.5 miles (26.5 kilometers) round trip, and a total elevation gain of 5,300 feet (1,615 meters). It’s a whopper.
These stats don’t include the walk from the parking lot to the trailhead, which may add some extra distance depending on where you park, although Yosemite valley tends to be pretty flat.
In summary, this is a very long and hard hike. If you can, definitely try to practice on some of the other hikes in the park before you do this one.
Most people do this as a day hike, or you can make it a bit more manageable by camping and spending 2 days or longer in the area with a wilderness permit. There’s a campground in Little Yosemite Valley, which is approximately halfway to Half Dome.
Half Dome Elevation: How Tall Is Half Dome?
Half Dome has a summit elevation of 8,844 feet (2,695 meters) above sea level.
This is high enough you may feel some minor altitude symptoms, such as shortness of breath and lower energy, but nothing serious enough to worry about, especially since you’ll be descending after you reach the top. Altitude sickness is basically a non-factor on this hike.
If you really want to go the extra mile (no pun intended) and prepare your body 100 percent, you could visit some of the other high points in the park before doing Half Dome.
Two good options for altitude practice are Yosemite Point or Glacier Point. They’re not as high as Half Dome, but they’re high enough to give your body some acclimation.
One of the craziest views on the Half Dome hike!
How Safe Is The Half Dome Hike?
Obviously there is some risk involved in climbing Half Dome, and there’s no denying that this is an extreme hike by most people’s standards.
I’d say Half Dome is definitely more dangerous than something like Angels Landing, and it’s a much longer and more strenuous hike too. However, I still think it’s safe enough if you’re careful and come prepared.
During the summer season, Half Dome is successfully climbed by up to 9,000 people per month, and there are relatively few incidents. In fact, before permits started being required in 2010, Half Dome was climbed by up to 40,000 people per month!
That doesn’t mean it’s a joke, though. Half Dome is steep. Very steep. Pictures don’t really do it justice, and I had more anxiety on the cables than I expected. Anyone who’s been all the way to the top would probably tell you the same thing.
Getting ready to climb the Half Dome cables
Before you start climbing the cables, remember to pack up any loose items from your bag (and pockets) so they don’t fall out and slide off the mountain, or even worse, hit someone below you.
The park ranger on duty kept repeating that to everyone who passed by, so I’m sure it has caused some issues for people. If you do drop something, don’t try to grab it either, or you could fall with it.
It’s strongly advised not to climb Half Dome if there are storm clouds in the area. Lightning can be very dangerous on the summit, and the cables and rock become very slick when wet. People have died on Half Dome in these conditions.
I also wouldn’t recommend the Half Dome hike for young kids, unfit older folks, or anyone who is not surefooted and comfortable with heights.
I saw a girl have a panic attack and start freaking out partway through the cable section on Half Dome. It caused a traffic jam on the cables and made things less safe for everyone until she was able to climb back down with help from bystanders.
For what it’s worth, I have some fear of heights but I’m also an experienced hiker who has done plenty of risky treks and climbs around the world, and I have to admit Half Dome was scary for me. One of the things running through my mind was the possibility of another hiker above me falling, and taking me out with them.
Whatever you do, don’t let go of the cables, even for a moment! I know it’s tempting to stop and take pictures, but unless you’re still holding a cable with at least one hand, there is nothing keeping you from slipping and falling off the edge of the cliff.
Deaths On The Half Dome Hike
There have been at least 11 accidental falling deaths on Half Dome over the years, and there have also been several deaths from lightning strikes.
The most recent falling death from the Half Dome cables was in 2019, when a 29 year old woman slipped and fell more than 500 feet off the mountain.
I don’t want to scare you out of doing the Half Dome hike if you’re able. The only reason I’m sharing this is to help you make an informed decision about whether this hike is the right one for you, and also to motivate you to be as safe as possible at Yosemite.
Don’t get me wrong, Half Dome is one of the best hikes in the United States, but it’s still a hike to take seriously, and not everyone should attempt it.
Read More: Half Dome Deaths
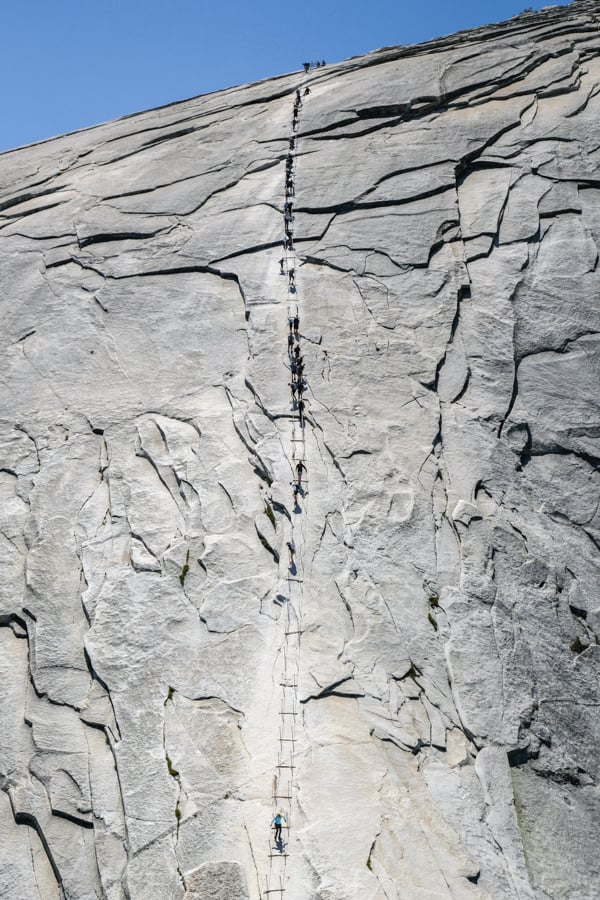
From below, the Half Dome hikers look like ants.
What To Bring To Half Dome Yosemite
- Shoes. Check the bottom of your shoes to make sure they’re grippy. On the last part of the hike, you’ll be climbing on steep, slippery rock. You absolutely need hiking shoes or boots with good grip for the Yosemite Half Dome hike.
- Water. The park rangers recommend 4 liters of water per person, although I used less. If you’re going in the middle of the day when it’s hotter, you may need every bit of that. If 4 liters is too much to carry, then you can filter water above Nevada Falls.
- Snacks. Bring some salty and sugary snacks to eat during the hike. If nothing else, you can enjoy them at the top of the mountain, after climbing the Half Dome cables!
- Sun Protection. There’s no shade at all on Sub Dome or Half Dome. You’ll definitely want sunscreen and a hat.
- Gloves. It’s essential to have gloves for climbing the Half Dome cables! You need them to keep your hands safe and give you better grip. I wouldn’t do this hike without gloves. There used to be a pile of spare gloves at the bottom of the cable section for people to take and use, but it’s gone now. Definitely bring your own. Any kind of gloves will work. Here are some grippy Carhartt gloves on Amazon.
- Harness. This one is optional, and most hikers on Half Dome don’t use a harness. You’re safer with a harness, but it’s awkward to use and it’ll slow you down. I’ll discuss this a bit more in the section below.
- Headlamp. You’ll need a light if you start the hike very early, or just in case you get back really late. Remember to bring fresh batteries too. This is a very long hike, so it’s common to get back to base after dark.
- Poncho. If you’re hiking in the spring, you might need a poncho for the section of the Mist Trail that passes Vernal Falls. When the waterfalls come alive, it can be extremely wet there!
- Water Filter. I brought a LifeStraw for filtering drinking water along the trail. It’s very lightweight and easy to use. Water purification tablets are another option.
- Permit. Remember to bring your permit and an ID, such as your driver’s license. Showing the permit email is enough, you don’t need to print a paper copy.
Half Dome Yosemite National Park
Should You Use A Harness For Half Dome?
If you want to be as safe as possible on the Half Dome hike, you could use a climbing harness for the cable section.
The way a ‘via ferrata’ harness works is you clip your carabiners onto the cable, unclipping them one at a time when you reach an obstruction (in this case one of the poles), and then reclipping them one at a time on the other side. That way you’re always clipped onto the cable with at least one carabiner, keeping you safe if you happen to slip and fall.
You can buy a high-rated climbing harness and lanyard on Amazon. The manufacturer, Petzl, also has some helpful tutorials on their website for how to use a via ferrata system.
Keep in mind, a harness is not required for hiking the Half Dome cables. In fact, I would estimate less than one-fifth of hikers on Half Dome use a harness. That’s because it’s slower, more complicated, and more awkward.
However, the option is there if you need it, and ultimately it’s safer than going without.

You can use a climbing harness for more safety on the Half Dome cables (© Petzl)
Other Tips For Half Dome Yosemite
- Bathrooms. There are toilets directly by the trail at Vernal Falls and Nevada Falls. After that, you’ll have to do it in the woods. However, once you start climbing Sub Dome and Half Dome, there are no trees or privacy anymore for the rest of the hike to the summit, even for a quick pee. So make sure you take care of business before you start climbing the Sub Dome.
- Cell Service. Below Vernal and Nevada Falls you might not get any cell phone reception or texts, but at Sub Dome and Half Dome I had a little. This can come in handy if you have any important messages to send or receive.
- Water Sources. There is potable drinking water by the Vernal Falls foot bridge early in the hike. If you have a water filter, you can also get drinking water from the Merced River above Nevada Falls or in Little Yosemite Valley.
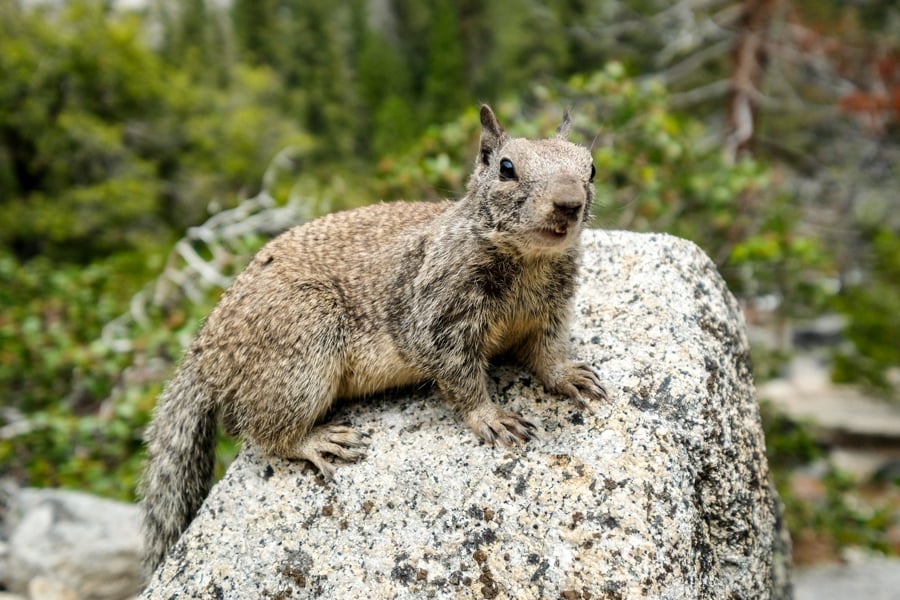
Curious squirrel
When To Start The Half Dome Hike
I would recommend being at the trailhead to start the Half Dome hike at around 5 AM. This is a very long hike and you need an early start if you want to get back before dark. Plus, the later you go, the worse the crowds and heat will be, making everything harder.
The cables are busiest between 11 AM and 2 PM. If you manage to reach the Half Dome cables section before 9 AM, it’s usually much less crowded, making it safer and easier to climb. Getting to the trailhead at around 5 AM is your best bet for this.
Unfortunately, if you’re staying somewhere outside of Yosemite valley, you’re going to need an even earlier start. My wife and I were staying in the town of Oakhurst, which is a 1.5 hour drive from Yosemite valley, so that meant I had to wake up at around 3 AM.
I am not a morning person at all, and just starting this early was a big challenge in itself. I hastily ate my ‘breakfast’ and got on the road at about 3:30 AM, which put me at the trailhead around 5 AM.
Thankfully, finding parking in Yosemite is a piece of cake at this time, so that’s one silver lining of starting so early.
Half Dome Trailhead: How To Get There
Half Dome uses the same trailhead as the Mist Trail and the John Muir Trail (JMT), but the closest parking lot is the Yosemite Valley Trailhead Parking.
There’s no parking directly at the trailhead for the Mist Trail, but fortunately it’s only a 1/2 mile walk on flat pavement to get from this parking to the trailhead. If you’re lucky enough to get a camping reservation at the Upper Pines Campground, that’s also very close.
You can use the map below for the Half Dome parking and trailhead, or enter this address for navigating there: Parking lot, Happy Isles Lp Rd, Yosemite Valley, CA 95389
The other option is to have someone drive you to the Mist Trail / Half Dome trailhead and drop you off there directly. In that case, your friend can drop you directly at the Mist Trail (map and GPS here), and that would save you 10 minutes of walking.
If you’re planning to use the Yosemite valley shuttle to get to the trailhead, the Stop 16 (Happy Isles) is near the starting point for the Mist Trail and Half Dome. However, the shuttle only starts at 7 AM, so it’s not an option if you want an early start for this hike.
Is Half Dome Open / Closed?
You can check the current status of the Half Dome cables on the National Park Service website.
The Half Dome cables are normally put up the Friday before the last Monday in May (Memorial Day), and the last day to use the cables is the day after the second Monday in October.
Outside of these dates, the Half Dome cables are taken down by the National Park Service, and it’s much harder and more dangerous to climb to the summit. Not recommended unless you know what you’re doing!
U.S. National Park Regulations
The Half Dome trail is part of Yosemite National Park, so the usual U.S. national park regulations apply.
As always, please remember to keep the trail clean, be considerate of other hikers, and leave no trace. Thanks and happy travels!
Entrance Fee
You’ll need a park pass to enter Yosemite National Park, but it’s pretty easy to get and you can buy it online or in person.
We normally get the annual pass and visit several U.S. parks in a year, but they also have daily passes. More information and current fees can be found on the Yosemite National Park website.

Half Dome as seen from the Panorama Trail. One of the most iconic views of Yosemite National Park.
Half Dome Lottery Permit System
Since 2010, the National Park Service requires day use permits (via lottery) for the Half Dome cables section. The reason for this change was because the trail was becoming extremely crowded and potentially less safe.
Before the change, Half Dome was getting more than 1,200 hikers per day during the busy season, but now only 300 hikers per day are allowed to climb. They split this into 225 permits for day hikers and 75 permits for backpackers.
I encountered traffic jams on the Half Dome cables even with the permit rules in place, so I can’t imagine how nightmarish it must have been in the old days when 4 times as many people were climbing the cables. I wish the permit system wasn’t necessary, but I think the Park Service did the right thing in this case.
Permits are required 7 days a week, all year long, except when the cables are down. In any case, it’s still an amazing hike, and I’ll explain how to get Half Dome permits in the following section.
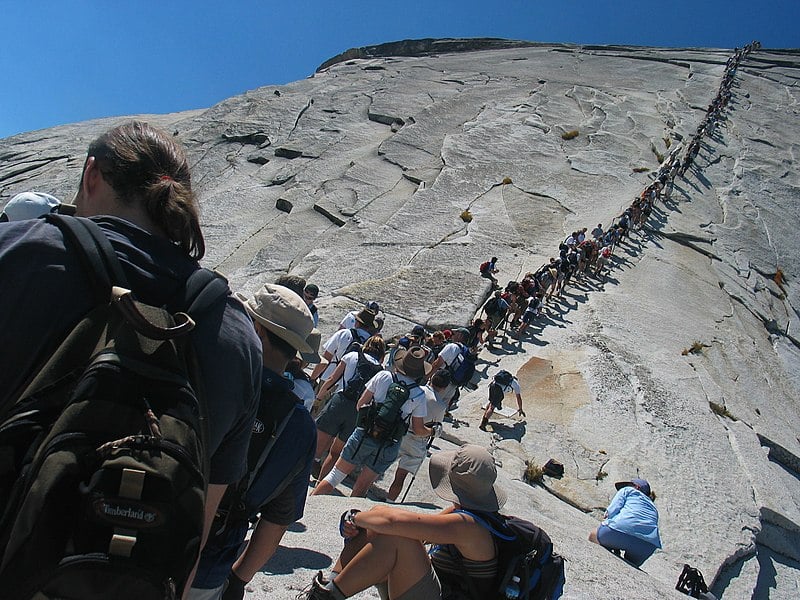
Old pic of Half Dome in 2004 before permits were required. Huge traffic jam! (© Wikimedia / Daniel Schwen)
How To Get Half Dome Permits
There are currently several ways to get permits for the Half Dome hike:
- Enter the pre-season lottery well before your trip
- Enter the daily lottery 2 days before your hike date
- Apply for a Yosemite wilderness overnight backpacking permit and add on Half Dome
- Use an unused spot on another hiker’s permit
According to the National Park Service website, permits are only needed for the Sub Dome and the Half Dome cables section. In other words, you can hike all the way up to the base of the Sub Dome without getting a permit, which is a pretty good hike in itself.
At the moment, it costs $10 USD to apply for Half Dome permits via lottery (which allows you to enter up to 6 people at a time), and then if you successfully receive a permit you’ll have to pay another $10 per person. The first fee is non-refundable, but the second fee is refundable if you cancel.
Logically, you have the best chance of getting Half Dome permits if you apply for a less busy day and/or month, when there aren’t as many people hiking in Yosemite National Park. For example, if you apply to hike on a weekday in September, you should have a better chance than a weekend in July.
You can find more info and apply for permits on the official National Park Service page in the link below!
Apply Now: Half Dome Permits / Wilderness Permits

Half Dome permits are handed out by lottery
Can You Hike Half Dome Without A Permit?
So what happens if you aren’t able to get a permit? Can you hike Half Dome without a permit? Yes and no.
First of all, I wouldn’t recommend trying to just sneak onto Half Dome without a permit. There’s a ranger at the base of the Sub Dome watching the access point every day, from very early in the morning until late in the evening, and if you’re caught you could be fined $280 USD or more.
However, if you aren’t able to get a Half Dome permit, there’s still hope. If you find someone with an unused spot on their permit, they can give it to you. This happens fairly often when someone gets a permit for their group, and then a member of the group has to drop out for some reason.
In my case, I actually applied to the daily Half Dome lottery no less than eight days in a row, and never won a permit for any of those days! My time at Yosemite was running out, so I decided to hike all the way up there and see if anyone had a spare permit I might snag.
Sure enough, after an hour or two of waiting, along came a middle aged woman who took one look at the Sub Dome and Half Dome, and decided there was no way she was climbing up there. She was kind enough to talk to the park ranger and give me her permit, and then up I went!
Obviously there’s no guarantee you’ll get a permit like this, but it worked for me, and I’ve seen it work for a bunch of other people who were in the same boat, so if the lottery isn’t working out for you then this may be something worth trying as a last resort!
Vernal Falls
Half Dome
Half Dome Via Glacier Point & Panorama Trail
Another way you can do the Half Dome hike is to start at Glacier Point and hike along the Panorama Trail, passing Illilouette Falls and eventually connecting with the John Muir Trail above Nevada Falls.
This is an uncommon route and it’s beautiful, with lots of views of Half Dome along the way. However, it’s harder than going the normal route from the Mist Trail. You’re looking at almost 21 miles roundtrip, and nearly 6,000 feet of elevation gain. Yikes.
You’d think this would be an easier route since you’re starting high up there at Glacier Point, but unfortunately there is a ton of elevation loss going down to Nevada Falls, and you have to make that up on the way back.
However, if you have a friend to drop you off at Glacier Point and then pick you up later at Yosemite valley, then that could be a good way to do it: hike to Half Dome from the Panorama Trail, and then hike down the Mist Trail or John Muir Trail afterwards. You’d be looking at 18.5 miles roundtrip and 3,700 feet of elevation gain if you do it like that, which is not bad at all.
It would be 2 miles longer than going the normal route to Half Dome on the Mist Trail, but you’d shave off 1,600 feet of elevation gain, plus you get to see some different views of Yosemite! It’s something to consider if you can make the logistics work for you.
Half Dome & Illilouette Falls as seen from the Panorama Trail
More U.S. National Park Travel Guides
Thanks for looking! I hope you enjoyed this travel guide for the Half Dome trail in Yosemite National Park, California.
Don’t forget to check out my other USA hiking guides before you go!